Why Prepare Text Properly for Laser Cutting
When it comes to laser cutting text, getting your design ready the right way is crucial. Poorly prepared text can lead to issues like incomplete cuts, jagged edges, or even wasted material. Laser cutting text isn’t just about typing out words—it requires careful attention to geometry, layout, and file format to make sure the machine interprets your design correctly.
Proper preparation ensures that your text is clean and ready for the laser beam to trace perfectly. This involves converting the text into the right vector format, fixing any overlapping lines or gaps, and optimizing the design to reduce cutting time and improve accuracy. If the text isn’t prepared correctly, you could run into problems like missing shapes or letters, which can delay your project and increase costs.
Whether you are designing for laser cutting or engraving, the goal is to make your text crisp and clear. Fusion 360 lets you create precise sketches and export DXF files tailored for laser cutting, but only if you prepare your text properly first. Taking a little extra time upfront pays off with flawless cuts and professional results every time.
In this guide, we’ll walk through exactly how to prepare your text in Fusion 360 to achieve perfect laser cutting outcomes and avoid common pitfalls.
Tools and Setup in Fusion 360
Before you start preparing text for laser cutting in Fusion 360, it’s key to set up the right tools. Fusion 360 is great for creating precise sketches and exporting clean DXF files, which most laser cutters accept. Here’s what you’ll need:
- Fusion 360 installed on your PC or Mac. Make sure it’s updated to the latest version for the best features and stability.
- Sketch workspace set up. This is where you’ll create and edit your text and shapes for laser cutting.
- Text tool in the Sketch tab — this lets you add and customize fonts. Not every font works great, so stick to simple, clean ones designed for laser cutting.
- Dimension and constraint tools to adjust your text size and ensure everything lines up perfectly.
- Export functions ready — Fusion 360 saves your sketches as DXF files used for laser cutting. You’ll want to double-check your export settings to keep the file clean and compatible.
Having these tools ready makes the process smooth and avoids headaches later on. Fusion 360 gives you a solid setup to turn your text designs into laser-cut-ready files without fuss.
Step-by-Step Guide to Preparing Text in Fusion 360
Getting your text ready for laser cutting in Fusion 360 might seem tricky at first, but breaking it down into clear steps makes the process smooth and reliable. This guide will walk you through each stage—from setting up your sketch to exporting the final DXF file—ensuring your design cuts clean and precise every time. Using Fusion 360’s powerful tools, you’ll create laser cutting-ready text that works perfectly with your CNC laser cutter or engraving machine.
Ready to dive in? Here’s how to prepare your text effectively for laser cutting right inside Fusion 360.
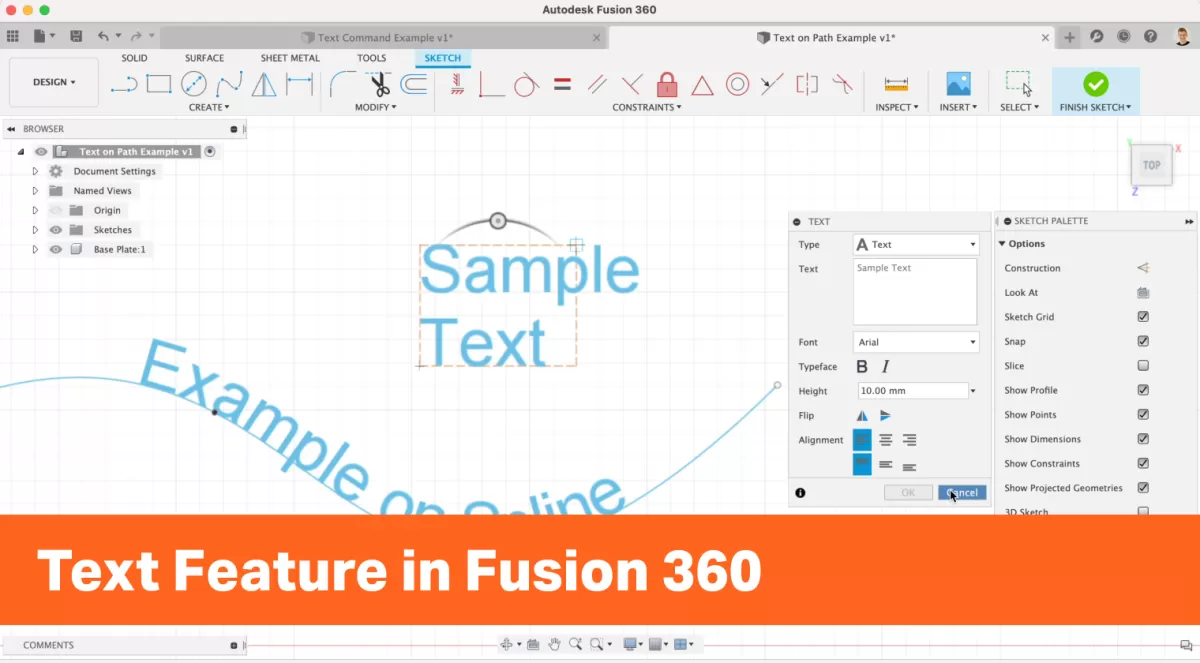
Step 1 Create a New Sketch
Start by opening Fusion 360 and creating a new sketch on the plane where you want your text to appear. This is the foundation for your laser cutting design. Select the “Create Sketch” option, then pick the right face or plane that matches your cutting material’s orientation.
Once the sketch is open, use the “Text” tool to type your desired text. Make sure you choose a font that works well for laser cutting—simple, clear fonts with clean edges work best. Avoid fonts with too many curves or thin lines, as they might not cut cleanly.
Keep your text size appropriate for your project. Too small, and it might be hard to cut or read later; too large, and it could waste material. After placing the text, confirm that it’s fully contained within your sketch boundaries and looks how you want it to before moving on to the next step.
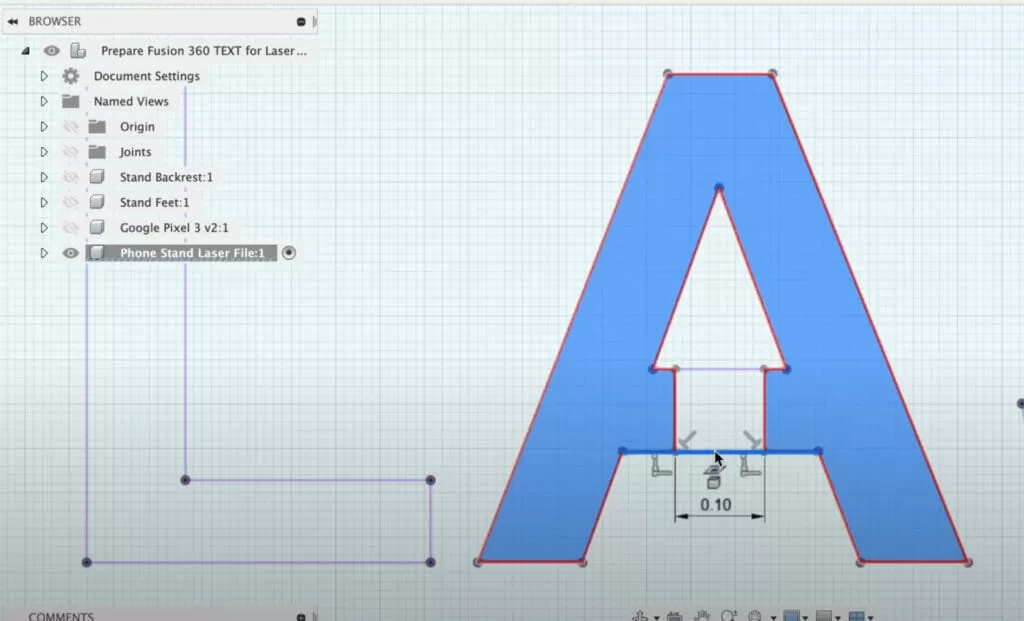
Step 2 Addressing Text Geometry Issues
After placing your text in Fusion 360, the next step is to clean up the geometry to make sure it’s laser cut-ready. Text created in Fusion 360 often has overlapping lines, open paths, or extra curves that can confuse the laser cutter.
Here’s what to do:
- Convert Text to Curves: Right-click your text and choose “Create Sketch Text” then convert it to curves or outlines. This lets you edit each letter like a shape, ensuring clean paths.
- Check for Overlaps: Zoom in and look carefully for overlapping lines or shapes inside letters like “O,” “P,” or “A.” Use the Trim or Extend tool to merge or remove redundant lines.
- Close Open Paths: Open paths can cause the laser to stop working properly. Use the “Close Path” or “Project Geometry” tools to seal any gaps.
- Simplify Complex Curves: Sometimes complex fonts create too many tiny curves that the laser doesn’t need. Simplify these by selecting unnecessary points and deleting or merging them.
- Verify Inner Cutouts: Letters with holes (counter spaces) like “B,” “D,” or “Q” should have their inner shapes clearly separated from the outer ones. This prevents double cuts or missing details.
Properly addressing these text geometry issues ensures your design flows smoothly and avoids mistakes during cutting or engraving. This step is key to creating precise laser cutting text designs in Fusion 360.
If you want to learn more about choosing the right fonts for laser cutting, check out this guide on top fonts for laser cutting.
Step 3 Extruding and Converting to 2D
Once your text sketch is clean and free of any overlapping or broken geometry, the next step is to extrude it. Extrusion in Fusion 360 gives your text a 3D shape, which is useful for 3D modeling but not for laser cutting since laser cutters work with 2D paths.
Here’s what you do:
- Select your finished text sketch in Fusion 360.
- Use the Extrude tool to give the text a slight height (usually just a few millimeters).
- After extruding, you’ll want to convert this 3D object back into a flat 2D shape for your laser cutter.
- To do this, create a new sketch on the face of the extruded text. This will project the 3D text outline back onto a flat plane.
- Finish the sketch, and now you have the precise 2D outlines needed for laser cutting.
This extrusion and projection process helps ensure your laser cutter reads the exact paths without any distortion or hidden geometry issues. Remember, the goal is to generate clean, simple 2D outlines for your DXF export.
If you want more details on exporting DXF files properly, check out our guide on 4 ways to export a DXF from Fusion 360.
Step 4 Exporting the DXF File
Once your text design is finalized and cleaned up in Fusion 360, the next crucial step is exporting it as a DXF file. DXF is the standard format laser cutters recognize, so getting this right ensures smooth cutting or engraving.
Here’s how to export your text as a DXF in Fusion 360:
- Finish your sketch with the prepared text geometry visible.
- Right-click on the completed sketch in the browser panel.
- Select Save as DXF from the dropdown menu.
- Choose a destination folder on your computer and name your file clearly to avoid confusion.
- Click Save to export.
Before you send the DXF to your laser cutter, open it in a vector editor or laser software to double-check that all paths are intact and that the text outlines are clean. This helps avoid issues like missing lines or unexpected cuts.
Exporting DXF from Fusion 360 correctly is key to precision in laser cutting text designs. If you’re interested in more insights on laser cutting materials and methods, check out this guide on common laser processing methods.
Step 5 Pre-Flight Checklist
Before exporting your text for laser cutting, it’s crucial to run through a quick pre-flight checklist. This helps avoid common issues and ensures your Fusion 360 sketch is ready for a smooth cutting process.
Check these key points:
- Closed Profiles: Make sure all text paths are fully closed. Open paths can cause the laser to cut incorrectly or skip sections.
- No Overlapping Lines: Overlapping or duplicate lines confuse the laser cutter and might cause slow or double cuts.
- Proper Scale: Confirm your design is at the correct size for your project. Scaling after exporting DXF files can mess up the cut.
- Single Plane Sketch: Your text must be flattened on one plane—laser cutters use 2D vector paths only.
- Correct Font Selection: Use laser-friendly fonts (avoid very thin or overly intricate fonts) for better cut results.
- Simplify Geometry: Remove unnecessary details or excessive curves that aren’t needed for the cut.
- DXF Export Settings: Double-check you export your sketch as a DXF file correctly, preserving all vector paths.
Getting your text and DXF file checked saves you time and material when sending your design to the laser cutter. This pre-flight step is a small effort with a big payoff.
Video Tutorial Preparing Text for Laser Cutting
If you’re more of a visual learner, a video tutorial on preparing text for laser cutting in Fusion 360 is a great way to get hands-on guidance. The video walks you through everything—from setting up your Fusion 360 sketch for laser cutting to exporting the final DXF file ready for your CNC laser cutter. It covers key steps like fixing text geometry, extruding shapes, and making sure your design is clean and ready to go.
Following along with a video helps you avoid common mistakes and speeds up your learning curve. Plus, it’s perfect for U.S. makers who want a straightforward, step-by-step guide to laser cutting text without sifting through complex CAD jargon. Look for tutorials that specifically mention Fusion 360 laser cutting tutorials or preparing DXF files in Fusion 360 to get the most relevant tips.
Using a video guide can make your text designs sharper and more precise for laser cutting projects, saving you time and material in the process.
Tips for Optimizing Text Designs for Laser Cutting
When preparing text for laser cutting in Fusion 360, optimizing your design makes a big difference in the final result. Here are some practical tips to help your text cut cleaner and look sharper:
- Choose the right font: Use simple, bold fonts with clean lines. Avoid thin or script fonts since they can burn or break easily during laser cutting.
- Adjust letter spacing: Make sure letters aren’t too close together to prevent overlapping or fusing when cut.
- Convert text to sketches: Always convert text to sketches in Fusion 360 to avoid font compatibility issues when exporting DXF files.
- Fix overlapping lines: Check for and fix any overlapping or self-intersecting paths in your text design to help the laser cutter produce smooth cuts.
- Keep stroke width consistent: If engraving, keep line weights uniform. For cutting, outlines should be closed and continuous.
- Use appropriate size: Text that’s too small may not cut well, especially for detailed fonts. Aim for a minimum letter height of around 0.25 inches for clear cuts.
- Double-check layer settings: Ensure your laser cutter settings match your design layers—cut for outlines, engrave for fills or details.
- Export to DXF properly: Use Fusion 360’s export options to save your text as a clean DXF file. This format works best with most laser cutting software.
- Test with sample cuts: If possible, do a quick test cut on scrap material to see how your text design performs and adjust accordingly.
Following these tips will help you get the most out of your Fusion 360 laser cutting text projects and avoid common pitfalls.
Common Mistakes to Avoid
When preparing text for laser cutting in Fusion 360, avoiding common mistakes can save you time and material. Here are some to watch out for:
-
Not converting text to sketch curves: Fusion 360 doesn’t cut live text objects. You need to convert text into sketch geometry before exporting the DXF file for laser cutting.
-
Ignoring overlapping or open paths: Overlapping lines or open shapes can confuse the laser cutter, causing uneven cuts or engraving. Always check and fix these in your sketch.
-
Using fonts that are too thin or complex: Thin lines might burn away or not cut cleanly. Complex fonts with lots of small details may not translate well to laser paths.
-
Skipping the scale check: Your design’s size in Fusion 360 must match your laser cutter’s requirements. Always double-check scaling before exporting.
-
Forgetting to set the right units: Export DXF files in the units your laser cutter expects, usually inches or millimeters, to avoid size issues.
-
Not cleaning up the sketch before export: Extra construction lines or hidden geometry can cause errors during cutting. Keep your sketch tidy.
Avoiding these basic errors will help your Fusion 360 laser cutting project go smoothly and produce better results.
How HYCNC Can Help with Your Laser Cutting Projects
When it comes to turning your Fusion 360 laser cutting designs into reality, HYCNC is a reliable partner. They specialize in CNC and laser cutting services that cater to local businesses and hobbyists across the U.S., making sure your projects get top-notch precision and quality.
Here’s how HYCNC can support your laser cutting needs:
- Expertise in DXF and Fusion 360 files: They handle your exported DXF files smoothly, ensuring your text designs and sketches for laser cutting come out exactly as planned.
- Custom laser cutting services: Whether you need engraving or cutting, HYCNC uses advanced CNC laser cutting tech to work on various materials with accuracy.
- Fast turnaround: With streamlined processes, you get your finished parts without long waits—perfect for deadlines or quick prototypes.
- Local support and guidance: Based in the U.S., HYCNC offers direct customer service that understands your specific project requirements and can provide helpful advice.
- Quality checks: Every job undergoes strict inspection to make sure your laser cutting text designs and engraved elements meet the highest standards.
By partnering with HYCNC, you skip the hassle of setting up your own CNC machine, and you get access to professional-grade laser cutting. Whether it’s for small-scale projects or larger production runs, they help bring your Fusion 360 text designs to life with ease and precision.
Frequently Asked Questions
How do I create a DXF file for laser cutting in Fusion 360?
Start by creating your text as a sketch, fix any geometry issues, then export the sketch as a DXF file. This file works perfectly with most laser cutters.
Can I use any font for laser cutting in Fusion 360?
Not all fonts work well. Stick to simpler, cleaner fonts with clear outlines to avoid cutting errors. For a list of recommended fonts, check out our top fonts for laser cutting.
Why do I need to prepare text properly before laser cutting?
Proper preparation ensures your text cuts cleanly without missing parts or unexpected errors. It also helps keep your project on time and budget, avoiding wasted materials.
What’s the best way to fix text geometry issues in Fusion 360?
Use the “Sketch” tools to close gaps, simplify curves, and convert text outlines into closed profiles. This step is crucial before exporting your DXF.
Can Fusion 360 handle text engraving as well?
Yes, Fusion 360 can prepare text for both cutting and engraving by adjusting the sketch and toolpaths accordingly.
Is there a way to check my file before sending it to the laser cutter?
Yes, before exporting your DXF, run a pre-flight checklist: check for open profiles, overlapping lines, and confirm text is converted to 2D sketch geometry.
How can HYCNC help with my laser cutting project?
We offer CNC laser cutting services tailored to your needs, including design review, material selection, and precise cutting to save you time and money. Learn more about our laser cutting services.
If you want to dive deeper into laser cutting basics or related CAD skills, check out our blog on what is laser cutting.