DIY Anodizing Aluminum at Home: A 10-Step Guide
You’ve probably wondered how to give your aluminum parts a sleek, durable, and vibrant finish without breaking the bank. DIY anodizing is the answer—a rewarding process that transforms your metal projects with corrosion-resistant, colorful coatings. As a hobbyist or small-scale maker, I know the thrill of mastering a new skill, and I’ve distilled my experience into this step-by-step guide to make anodizing aluminum at home simple and safe. Whether you’re customizing bike parts or crafting unique prototypes, these 10 steps will empower you to achieve professional-looking results. Worried about complexity? Don’t be—this guide breaks it down with practical tips and safety know-how. Plus, if you’re aiming for flawless precision, HYCNC’s professional anodizing services are just a click away. Ready to dive into the world of DIY anodizing? Let’s get started!
What You’ll Need for DIY Anodizing
Before diving into the anodizing aluminum process at home, having the right materials and tools is essential for success and safety. Here’s what you’ll need to get started with DIY anodizing:
- Aluminum parts: Make sure they are clean and free from coatings or paint.
- Power supply: A DC power source capable of delivering stable voltage (around 12 volts) and adjustable current.
- Anodizing bath container: A plastic or non-metallic tub resistant to sulfuric acid.
- Sulfuric acid: The primary electrolyte for the anodizing bath (handle with care, this is corrosive).
- Distilled water: For mixing acid and rinsing parts to prevent contamination.
- Cleaning agents: Degreasers and mild acids (like vinegar or sodium hydroxide) to prepare surfaces.
- Anodizing dyes (optional): For coloring aluminum after anodizing.
- Sealing solution: Hot water or specialized sealing chemicals to lock in pores.
- Safety gear: Acid-resistant gloves, goggles, apron, and proper ventilation.
- Wiring and clips: To connect the aluminum part as the anode and a cathode (usually lead or stainless steel).
With this kit ready, you can start the electrochemical anodizing guide step by step, turning plain aluminum into a durable, vibrant finished product. Keep in mind, using a home anodizing kit means respecting safety precautions and working methodically to get the best results.
Safety Precautions for DIY Anodizing

When anodizing aluminum at home, safety has to be your top priority. You’re working with electricity and chemicals like sulfuric acid, so taking the right precautions is essential to avoid accidents.
Here’s what you need to keep in mind:
- Wear protective gear: Use gloves, safety goggles, and a chemical-resistant apron to protect your skin and eyes from acid splashes.
- Work in a well-ventilated area: The anodizing process can release harmful fumes, so make sure your workspace has plenty of fresh air or use a fume extractor.
- Handle chemicals with care: Always add acid to water, never the other way around, to prevent dangerous reactions. Store chemicals safely and label them clearly.
- Use insulated tools and equipment: When setting up the power supply, avoid contact with live wires or terminals to prevent electrical shocks.
- Have emergency measures ready: Keep baking soda and a first aid kit nearby in case of acid spills or skin contact. Know where your nearest eyewash station or water source is.
- Avoid distractions: Stay focused on your work and never leave the process unattended when the power is on.
Following these anodizing safety tips will help you complete your DIY aluminum finishing project without risking your health or damaging your workspace.
10 Steps to Anodize Aluminum at Home
If you’re ready to try DIY anodizing, here’s a simple 10-step process to anodize aluminum at home. This guide covers everything from prepping your parts to sealing your finish.
Step 1 Clean the Aluminum Surface
Start by thoroughly washing your aluminum parts to remove any dirt or debris. Use warm water and soap to get rid of surface contaminants that could affect the anodizing process.
Step 2 Degrease the Parts
Next, remove any oils or grease using a degreaser or a mild alkaline cleaner. This step is crucial because any leftover grease can cause uneven anodizing.
Step 3 Etch the Surface
Etch the aluminum with a diluted solution of sodium hydroxide or similar chemical to open up the surface. This helps the anodized layer bond better.
Step 4 Desmut the Aluminum
After etching, treat the parts with a desmut solution to eliminate any residue like metals or oxides left behind. This ensures a clean surface for quality anodizing.
Step 5 Prepare the Anodizing Bath
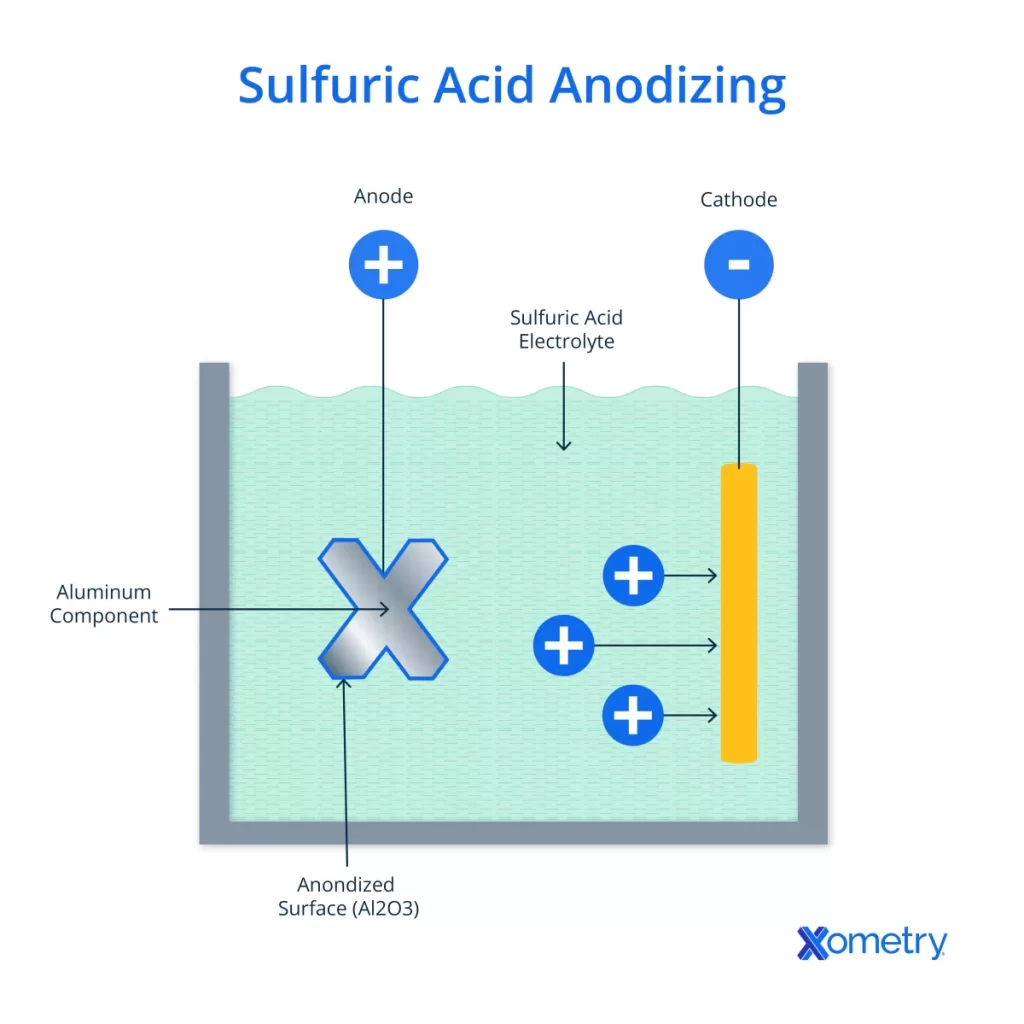
Mix your anodizing solution, usually sulfuric acid diluted with water, in a plastic tub or container. Be sure to follow safety guidelines precisely for handling acids.
Step 6 Set Up the Power Supply
Connect your power supply to the anodizing bath. Use a DC power supply with adjustable voltage, and hook up your aluminum part as the anode (positive terminal).
Step 7 Anodize the Aluminum
Submerge the aluminum in the bath and run the current for 30 to 60 minutes depending on the desired thickness. You’ll see tiny bubbles as the electrochemical reaction takes place.
Step 8 Rinse the Parts
Once anodizing is complete, rinse your parts in cold water to remove residual acid and stop the process. This helps avoid over-anodizing.
Step 9 Dye the Aluminum Optional
If you want color, now’s the time to dip your aluminum in anodizing dyes. These dyes penetrate the porous anodized layer, adding vibrant colors.
Step 10 Seal the Anodized Layer
Finally, seal the anodized surface by boiling or soaking the parts in hot water. This closes the pores and locks in the anodized finish for durability.
Following these steps lets you perform aluminum anodizing at home safely and effectively. It’s a rewarding way to finish metal with professional results using a home anodizing kit and simple tools.
Benefits of Anodizing Aluminum
Anodizing aluminum at home offers several clear benefits, especially if you’re into DIY aluminum finishing or small projects. Here’s why anodizing is worth considering:
-
Improved Durability: The anodizing process creates a tough oxide layer on the aluminum surface. This layer resists scratches, corrosion, and wear much better than untreated metal.
-
Better Corrosion Resistance: The protective coating helps prevent rust and damage from moisture, making your aluminum parts last longer, especially outdoors or in humid environments.
-
Enhanced Appearance: Anodizing lets you add color with dyes designed specifically for aluminum, giving your parts a sleek, professional look without paint that chips or peels.
-
Low Maintenance: The anodized surface is easy to clean and maintain. It doesn’t require frequent refinishing and stays looking good over time.
-
Environmentally Friendly: Unlike some metal finishing processes, anodizing doesn’t produce hazardous waste, making it a cleaner option for metal treatment at home.
By anodizing aluminum yourself, you get a cost-effective way to upgrade your parts with professional-quality results — perfect for hobbyists and small-scale projects in the USA.
Challenges of DIY Anodizing and Professional Alternatives
DIY anodizing aluminum at home can be rewarding, but it’s not without challenges. First, handling chemicals like sulfuric acid requires care and proper safety gear to avoid accidents. Maintaining the right voltage, temperature, and timing is crucial—small mistakes can lead to uneven coatings or weak anodized layers. Also, getting consistent color results with anodizing dyes for aluminum can be tricky without experience.
Another challenge is the equipment. A reliable home anodizing kit may not match professional CNC anodizing services in precision or durability, especially for complex parts. Plus, DIY anodizing can be time-consuming and might require several attempts to perfect.
For those who need high-quality finishes, tight tolerances, or large quantities, professional anodizing services are a smart alternative. These services offer:
- Advanced electrochemical anodizing processes
- Consistent color and coating thickness
- Better sealing methods for durability
- Support for CNC machined aluminum parts
Using professionals can save time, reduce safety risks, and ensure results that meet industry standards, especially for critical or commercial projects.
Tips for Successful DIY Anodizing
Anodizing aluminum at home can be rewarding, but a few simple tips can help you get the best results every time:
-
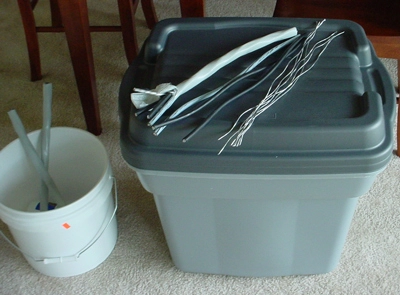
Use clean tools and containers
Contamination can ruin your anodizing bath or cause uneven finishes. Always clean your tanks, wires, and parts before starting.
-
Maintain correct bath temperature
Keep your sulfuric acid anodizing bath between 68–75°F (20–24°C). Too hot or cold affects the anodizing layer quality.
-
Control your power supply carefully
A stable, consistent current is key. Fluctuations can make the anodized layer patchy or weak.
-
Handle sulfuric acid with care
Always wear gloves, goggles, and work in a well-ventilated space. Follow anodizing safety tips to avoid accidents.
-
Use quality anodizing dyes if coloring
For a rich, even color, use dyes designed specifically for anodized aluminum. Avoid household or fabric dyes.
-
Don’t skip sealing
Sealing locks in the anodized layer and any dye you use. Use hot water or a commercial sealant for the best durability.
-
Test on scrap metal first
Before anodizing a finished part, practice on scrap aluminum to tune your process and settings.
-
Keep detailed notes
Record bath mix, temperature, voltage, and timing. This helps you repeat successful results or troubleshoot problems.
By following these tips, your DIY aluminum finishing will look professional and last longer—giving you great results with your home anodizing kit every time.