Are you ready to dive into SolidWorks and start creating 3D parts like a pro? Whether you’re a beginner or looking to refine your skills, mastering 3D CAD design can transform your ideas into reality, especially for CNC machining.
As a designer, I know how daunting it can feel to navigate new software. That’s why I’ve crafted this beginner-friendly guide based on real-world experience to help you create your first 3D part with confidence. From sketching to extruding, you’ll learn practical steps to design parts ready for HYCNC’s precision CNC machining services.
Let’s jump in and bring your designs to life!
What is SolidWorks and Why Use It for 3D Part Design
SolidWorks is a powerful 3D CAD software that helps users create detailed and precise 3D parts. It uses a parametric feature-based approach, which means every part you design is built using features like sketches, extrusions, and cuts that are linked by parameters. This method allows you to easily update dimensions or change shapes without starting over, making design adjustments smooth and efficient.
For beginners, SolidWorks is an excellent choice because it offers a user-friendly interface with intuitive tools that guide you through the design process. It’s widely used across many industries, making it a trusted industry-standard tool that ensures your designs meet professional requirements. Plus, it integrates seamlessly with CNC machining workflows, creating a direct path from your digital model to manufacturing.
SolidWorks designs are fully compatible with the HYCNC CNC machining process, allowing for precise and accurate 3D models to be used directly in manufacturing. This integration minimizes errors and production delays, ensuring your parts meet strict tolerances and quality standards. Using SolidWorks with HYCNC streamlines the transition from concept to finished product, empowering you to create manufacturable, high-quality parts efficiently.
Getting Started with SolidWorks
To begin with SolidWorks, you first need to download and install the software from the official website or through a licensed provider. Once installed, take some time to explore the interface—it’s designed to be user-friendly with clear menus and toolbars to help you navigate easily.
SolidWorks primarily uses three key file types you should know:
- Parts (.SLDPRT): These are individual 3D models you create, like a single component of a larger assembly.
- Assemblies (.SLDASM): Collections of parts put together to form a complete product or system.
- Drawings (.SLDDRW): 2D technical drawings generated from parts or assemblies, often used for manufacturing instructions.
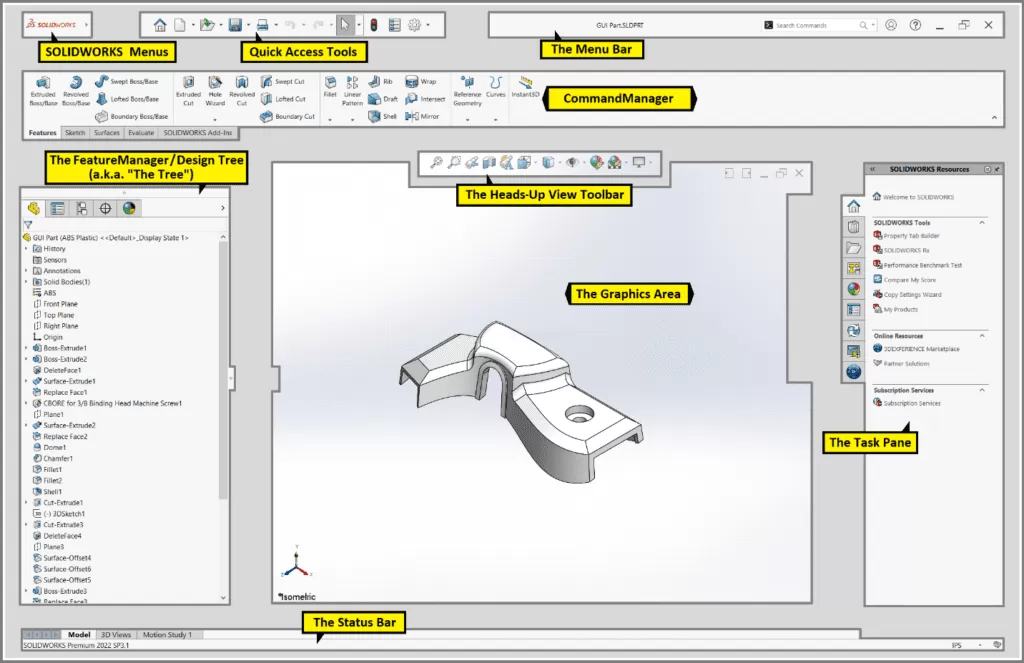
When working, the workspace can feel complex at first, but here are the main areas to focus on:
- Feature Manager: This panel lists all features and sketches in your model and helps you control your design history.
- Toolbars: These contain the sketch, feature, and evaluation tools you’ll use to build and modify your models.
- Default Planes: Front, top, and right planes are your basic sketching surfaces to start creating 2D profiles before shaping 3D parts.
Getting comfortable navigating these parts of SolidWorks will set a solid foundation for creating precise, ready-to-manufacture 3D parts.
Step-by-Step Guide to Creating a 3D Part in SolidWorks
Step 1 Starting a new part document
Begin by opening a new part file in SolidWorks. Choose your preferred unit system—millimeters or inches—to fit your project needs. Then, select a default plane (Front, Top, or Right) where you’ll start sketching your 2D design.
Step 2 Creating a 2D sketch
Use the sketch tools like line, circle, and rectangle to draw your base shape. Apply dimensions and add geometric relations to keep everything precise and fully defined. This parametric modeling approach makes it easy to adjust your design later.
Step 3 Extruding the sketch into a 3D model
Turn your 2D sketch into a 3D part using the Boss Extrude feature. Set the extrusion depth and direction to add volume to your design, giving it real-world thickness and shape.
Step 4 Adding features like holes fillets and chamfers
Add complexity with features such as holes, fillets (rounded edges), and chamfers (angled edges). Use tools like Revolve, Cut, Extrude, and Pattern to refine your model. Keep design intent in mind to ensure your part updates smoothly when edits are made.
Step 5 Reviewing and saving the part
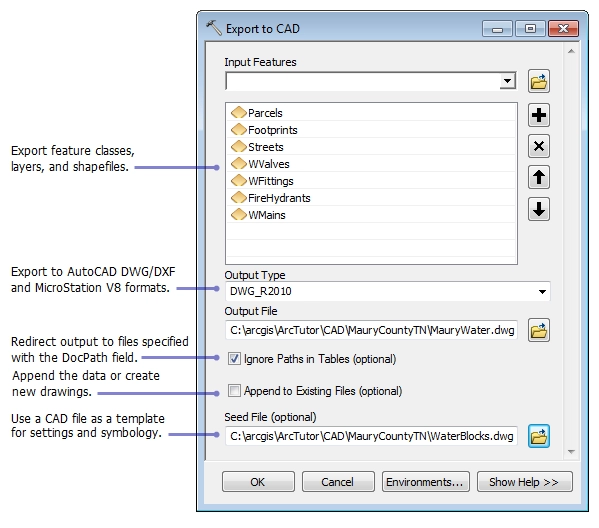
Check your 3D model carefully for any errors or issues. Save your work as a .SLDPRT file, the native SolidWorks part format. To prepare for CNC machining, export the model in common formats like STEP or IGES, which work well with manufacturing software.
Preparing Your 3D Part for CNC Machining with HYCNC
Getting your SolidWorks 3D part ready for CNC machining with HYCNC means focusing on design accuracy. A precise model ensures the part can be manufactured exactly as intended, minimizing costly mistakes and delays.
When exporting your SolidWorks file, use formats like STEP or IGES, which are widely accepted for CNC workflows. Make sure your model includes the right tolerances and clear dimensions to match machining capabilities.
HYCNC relies on these detailed 3D models to deliver precision CNC machining. Accurate digital files let their machines cut parts consistently and meet tight specs every time.
Here are a few tips to optimize your design for CNC:
- Avoid extremely thin walls or fragile features that can break during machining
- Maintain consistent wall thickness for stability
- Build in proper tolerances per the CNC machine’s capability
- Keep complex features clear and avoid unnecessary details that complicate toolpaths
Following these best practices helps HYCNC turn your SolidWorks 3D part into a high-quality manufactured component, ready for whatever project you have in mind.
Common Mistakes to Avoid When Creating 3D Parts
When creating 3D parts in SolidWorks, it’s easy to slip into habits that make your design harder to edit or manufacture. Here are the most common mistakes to watch out for:
-
Overcomplicating sketches
Keep your sketches simple and clear. Avoid adding too many lines or details at once. Complex sketches slow down your workflow and make changes more difficult later.
-
Ignoring design intent and parametric relationships
SolidWorks shines because of its parametric modeling. If you don’t set up proper relationships and constraints, your model won’t update properly when you make changes. Always think about how parts should behave when dimensions change.
-
Neglecting manufacturability for CNC machining
Just because you can design it, doesn’t mean it’s easy to make. Avoid very thin walls, tight tolerances beyond CNC capabilities, and features that are hard for machines to cut. Focusing on manufacturability ensures your design translates well from SolidWorks to the real world, especially with CNC services like HYCNC.
By keeping these points in mind, you’ll create cleaner, more efficient 3D parts that work better for CNC machining and save time in production.
Advanced Tips for SolidWorks Beginners
Once you’re comfortable with the basics of SolidWorks 3D modeling, it’s time to explore some features that can take your part design to the next level. Start by trying out sweeps, lofts, and patterns. These tools help create complex shapes and repeated features quickly without starting from scratch every time. For example, sweeps let you extend a profile along a path, while lofts blend different shapes smoothly.
Another useful tool is SimulationXpress, which is built into SolidWorks. It’s perfect for running basic structural analysis on your parts. This helps you check if your design will hold up under stress, so you can avoid costly mistakes before machining.
Don’t forget about MySolidWorks, the official SolidWorks online community. It offers tons of tutorials, forums, and learning resources designed specifically for beginners and advanced users alike. Using these resources will speed up your learning curve and help you troubleshoot problems as you design.
By exploring these advanced tips, you’ll not only improve your SolidWorks skills but also create better, more reliable 3D CAD designs suited for CNC machining and manufacturing.
Why Choose HYCNC for Your CNC Machining Needs
HYCNC specializes in turning your SolidWorks 3D models into precise, high-quality parts with expert CNC machining. Our services cover everything from milling and turning to multi-axis machining, ensuring we handle complex designs with accuracy and efficiency. We understand how important it is for your design to match the final product, and our team works closely with you to maintain design intent and tight tolerances.
What sets HYCNC apart is our seamless integration with SolidWorks files. We accept standard formats like .SLDPRT, STEP, and IGES, making it easy to move from 3D CAD design directly to manufacturing without losing critical detail. Whether you’re producing prototypes or low-volume production runs, we focus on quality, consistency, and fast turnaround to keep your project on track.
Ready to bring your SolidWorks designs to life? Contact HYCNC today for a quote or consultation and see how we can help streamline your CNC machining process.
FAQs
What is the easiest way to start a 3D part in SolidWorks?
The simplest way is to create a new part file, pick your unit system (inches or millimeters), and start a 2D sketch on one of the default planes. Focus on basic shapes using sketch tools like lines and circles, then use features like Boss Extrude to turn your sketch into a 3D model.
Can I use SolidWorks for CNC machining?
Yes, SolidWorks is widely used for CNC machining. Its parametric 3D models can be exported in CNC-friendly formats like STEP or IGES, allowing precise control over your designs, which is essential for machining accuracy.
How do I avoid errors in 3D part design?
Keep sketches simple and organized.
Maintain parametric relationships to ensure changes update smoothly.
Always design with manufacturing in mind — avoid overly thin walls and impossible details.
Double-check dimensions and use SolidWorks’ built-in error checking tools.
Where can I learn more about SolidWorks?
There are great tutorials and resources online, including the MySolidWorks community. For a hands-on guide, check out this introduction to creating 2D sketches in SolidWorks to build strong fundamentals.
How can HYCNC help with SolidWorks designs?
HYCNC specializes in turning your SolidWorks models into precision CNC machined parts. We guide you through file preparation, optimize your designs for manufacturability, and ensure your parts meet quality standards. Contact us for a quote or consultation tailored to your project needs.