Why Use an Imported Picture in SolidWorks
Using an imported picture in SolidWorks is a practical way to jumpstart your design process. Whether you’re reverse engineering a part, creating a custom logo, or replicating a complex shape, starting with an image makes sketching faster and more accurate.
Use Cases
- Reverse Engineering: Trace old parts or components without original CAD files.
- Logo and Graphic Design: Easily convert logos or graphical elements into 3D models.
- Prototyping: Quickly draft ideas by tracing sketches or concept images.
- CNC Machining: Prepare sketches that serve as the basis for CNC toolpaths.
Benefits
- Accuracy: Tracing over a precise image reduces guesswork in sketching.
- Efficiency: Speeds up model creation by providing a clear reference.
- Consistency: Ensures your design follows exact shapes and proportions.
- Better Communication: Visual clarity helps when sharing designs with clients or manufacturers.
At HYCNC, we understand how important precision and efficiency are in your workflow. Using imported pictures to create sketches in SolidWorks bridges the gap between idea and product, streamlining your path toward high-quality CNC machining and prototyping. Our services support you every step, from initial design to final manufacturing.
Preparing Your Image for SolidWorks
Choosing the Right Image
Picking the right image is key when you want to create a SolidWorks sketch from a picture. Go for clear, high-contrast images with simple shapes or outlines. Avoid blurry or low-resolution pictures—they make tracing tough and can lead to inaccuracies. If possible, use black and white or grayscale images because they’re easier to convert into sketches than full-color photos.
Pre-Processing Tips
Before importing your image into SolidWorks, clean it up using basic image editing tools:
- Crop out unnecessary parts to keep only the area you need.
- Increase contrast to highlight edges and important details.
- Convert the image to grayscale or black and white to simplify tracing.
- Resize the image so it fits within your sketch area without losing detail.
Doing this prep work saves time and makes the tracing process smoother.
HYCNC Tip
HYCNC recommends using vector-based images like SVG or DXF when possible. Vector images work better with SolidWorks since they scale without losing quality and are easier to trace than raster images (JPEG, PNG). If you can convert your picture to a vector format before importing, you’ll get cleaner, more accurate sketches ready for CNC machining.
Step-by-Step Guide Importing and Sketching in SolidWorks

Start a New Sketch
Open SolidWorks and create a new part. Select a plane (Front, Top, or Right) where you want to build your sketch. Click on “Sketch” on the toolbar to begin a fresh 2D sketch.
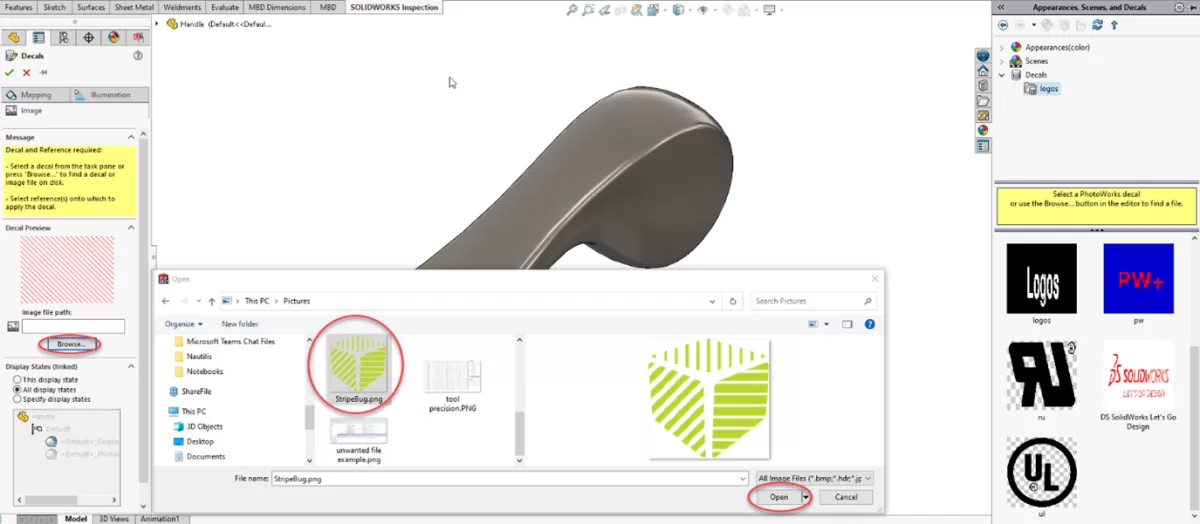
Import the Image
Go to Tools > Sketch Tools > Sketch Picture to browse and import your prepared image. SolidWorks supports common image files like JPG, PNG, or BMP. Once loaded, the picture will appear directly in your sketch workspace.
Position and Scale the Image
Move the image into place by dragging it on the sketch plane. Use the corner handles to resize and scale the image accurately. To set an exact scale, right-click on the image, select “Properties”, and input the real-world dimension (like a specific length on the image) for precise scaling.
Trace the Image
Use SolidWorks sketch tools such as Line, Spline, Arc, and Circle to trace over the image. Zoom in on details for accurate edges. This is where attention to detail pays off, especially for reverse engineering or CNC machining preparation.
Refine and Dimension the Sketch
After tracing, delete or hide the image to see your sketch lines clearly. Add dimensions and constraints to define geometry precisely. This step turns a rough trace into a usable, fully defined sketch ready for modeling or exporting.
Verify and Save
Double-check your sketch for accuracy and completeness. Save your SolidWorks file as part of your documentation. From here, you can extrude your sketch or export it for CNC use.
HYCNC Insight
Remember, a clean and well-dimensioned sketch reduces errors later in machining. Taking the time to scale and refine your sketch upfront means smoother CNC processing and better results with HYCNC’s precision machining services.
For more on starting sketches in SolidWorks, check our Introduction to SolidWorks Creating a 2D Sketch.
Advanced Tips for Optimizing Your Sketch
Using Vector Files
Whenever possible, use vector images like SVG or DXF instead of raster images (JPEG, PNG). Vector files keep the lines sharp and make tracing much easier in SolidWorks. This saves time and improves the overall accuracy of your SolidWorks sketch from a picture.
Autotrace Limitations
SolidWorks has an Autotrace feature, but it often struggles with complex or low-quality images. Autotrace works best with clean, high-contrast images. If your image is noisy, expect to spend extra time fixing and cleaning up the sketch after tracing.
Enhancing Accuracy
To boost precision in your sketch:
- Zoom in for detailed tracing
- Use snapping and construction lines to keep geometry aligned
- Dimension your sketch as you go to lock in scale and proportions
- Break complex shapes into smaller, manageable parts for cleaner outlines
Preparing for CNC
Before sending your sketch to CNC machining:
- Double-check all dimensions match your design intent
- Simplify curves where possible to reduce machining time
- Convert your sketch to appropriate formats (like DXF) that CNC machines read easily
HYCNC Pro Tip
At HYCNC, we recommend always cleaning up and validating your sketch before machining. A well-optimized sketch means fewer errors on the shop floor, faster turnaround, and higher quality parts. Don’t hesitate to reach out if you want expert help turning your sketches into precision CNC parts.
Common Mistakes to Avoid
When creating a sketch from an imported picture in SolidWorks, avoid these common pitfalls to save time and get cleaner results:
-
Using low-quality images
Blurry or pixelated photos make tracing difficult and inaccurate. Always start with a clear, high-resolution image.
-
Skipping image scaling
Not properly scaling your imported picture can lead to sketches that don’t match real-world dimensions. Always set the scale before tracing.
-
Ignoring image placement
Placing the image off-center or at an angle complicates sketching and dimensioning later. Align your picture neatly in the sketch plane.
-
Relying too much on Autotrace
The built-in autotrace tool isn’t perfect—it may miss details or create messy lines. Use it as a starting point, but plan to clean up manually.
-
Overloading the sketch with unnecessary lines
Keep your sketch simple. Too many extra lines or details can slow down performance and make editing tougher.
-
Not using vector files when available
Vector images like DXF or SVG files are easier to trace with cleaner results compared to raster images (JPEG, PNG).
-
Neglecting to dimension and constrain the sketch
Without proper dimensions and constraints, your sketch won’t be reliable for modeling or CNC work.
-
Forgetting to save versions
Save your work regularly and consider saving versions as you refine the sketch. It helps recover if something goes wrong.
Avoiding these mistakes will make your SolidWorks sketching from images smoother, more accurate, and better prepared for CAD modeling or CNC machining.
For a detailed intro to SolidWorks 2D sketching, check out this helpful guide from HYCNC Introduction to SolidWorks Creating a 2D Sketch.
Turning Your Sketch into a 3D Model or CNC Part
Once you have your sketch ready in SolidWorks, the next step is turning it into a 3D model or a CNC-ready part. Here’s how I usually approach it:
Extruding the Sketch
- Open your finalized 2D sketch in SolidWorks.
- Use the Extrude Boss/Base feature to pull your sketch into a 3D shape.
- Set the thickness or depth depending on your design needs.
- You can add cuts or holes by using the Extruded Cut option on other sketches as needed.
This process creates a solid part that you can further modify or prepare for manufacturing.
Preparing for CNC Machining
- Check your model for machinability: look for sharp corners or thin walls that might be tricky on CNC machines.
- Add fillets or chamfers where necessary to improve tool movement and part strength.
- Export your model in a CNC-friendly format like STEP or IGES.
- If you’re using HYCNC, their team can help optimize your files for smoother machining and better results.
HYCNC Services
HYCNC offers specialized CNC machining services, handling everything from prototyping to full production runs. They work closely with SolidWorks users to ensure your designs translate perfectly from digital sketches to physical parts. Whether you need milling, turning, or custom finishing, HYCNC has the tools and experience to bring your project to life efficiently.
By following these steps, you turn your imported picture into a working 3D model and create CNC-ready parts without hassle.
FAQs
Can I create a SolidWorks sketch directly from any picture?
You can import most common image files like JPG or PNG, but cleaner, high-contrast images work best. Vector files like DXF or SVG offer better tracing accuracy in SolidWorks.
How do I scale an imported image for accurate sketching?
After importing, use the scale tool or dimension your sketch based on known measurements in the image. This ensures your sketch matches real-world sizes.
Is there an automatic way to trace an image in SolidWorks?
SolidWorks has an autotrace feature that helps, but it’s not perfect. Manual tracing with sketch tools often gives better results for complex images.
What file types are best for importing into SolidWorks?
Vector formats like DXF or DWG are preferred if your image is a technical drawing. For photos, PNG or JPEG works but may need cleanup before sketching.
How do I prepare my sketch for CNC machining?
Ensure your sketch lines are fully defined and closed. Export your sketch as a DXF if needed, and double-check for any gaps or overlapping lines to prevent CNC errors.
Can I turn my sketch into a 3D model easily?
Yes, once your sketch is complete, use features like extrude or revolve in SolidWorks to build your 3D model quickly.
Where can I find more SolidWorks tips for working with sketches?
Check out detailed tutorials like Introduction to SolidWorks Creating a 2D Sketch or guides on exporting DXF files for CNC use on the HYCNC blog.
If you want a smoother workflow from picture to manufacturing, pre-planning your image quality and taking time to manually refine your sketch pays off.