What is a DXF File and Why It Matters for CNC
If you’re working with CNC machining, you’ve probably heard about DXF files, but what exactly are they and why are they so important? DXF stands for Drawing Exchange Format, and it’s a type of CAD file widely used to transfer 2D designs between different software and CNC machines. Unlike other CAD formats, DXF is designed to be a universal language that helps bridge the gap between your SolidWorks models and the machines that cut, engrave, or mill your parts.
In the CAD-to-CNC workflow, the DXF file acts as a clean, simplified outline of your design, making it easier for CNC machines to interpret. SolidWorks designs, whether sketches, flat patterns, or drawings, can be exported to DXF format so CNC tools can follow exact paths for cutting or machining. This format strips away 3D surfaces and unnecessary details, focusing on the 2D geometry like lines, arcs, and curves that control the cutting tools.
Using DXF files means you get smooth communication between SolidWorks and your CNC equipment without losing critical details or precision. This also ensures compatibility across various CNC software platforms and machines so your designs produce accurate, high-quality parts every time. Getting your DXF export right is the first step to flawless CNC machining.
Preparing Your SolidWorks Model for DXF Export
Before exporting your design to a DXF file, it’s important to get your SolidWorks model ready to avoid headaches down the road. Start by cleaning up your model—remove any unnecessary lines, shapes, or hidden geometry that won’t be needed in the CNC process. Keeping only what’s essential helps prevent confusion and errors during machining.
Next, double-check your units and scale. CNC machines rely on precise measurements, so make sure your SolidWorks file is set to the units the machine expects (inches or millimeters). Confirming the scale matches what your CNC setup requires will save you from parts that are too small or too large.
If you’re working with sheet metal parts, be sure to use flat patterns or sketches for the DXF export. Flat patterns give the CNC machine accurate outlines to work with, especially for cutting and bending operations. Exporting from the flat pattern instead of a 3D model ensures the DXF file correctly represents the part’s true shape.
By preparing your model carefully in SolidWorks, you’ll make your DXF files cleaner, more accurate, and ready for smooth CNC machining.
Step-by-Step Guide Exporting to DXF from SolidWorks
Exporting your design to a DXF file from SolidWorks is straightforward once you know the right steps. Here’s how to handle the most common methods, along with key export settings to keep your CNC job smooth.
Exporting a Sketch to DXF
- Open your SolidWorks part file.
- Select the 2D sketch you want to export from the feature tree.
- Right-click the sketch and choose Save As.
- In the save dialog, pick *DXF (.dxf)** as the file type.
- Confirm export options like units and whether you want to save as 2D or 3D.
- Save the file to your preferred location.
This method works best for simple profiles or outlines that CNC machines will cut or engrave.
Exporting Sheet Metal Flat Patterns to DXF
Sheet metal parts require you to export the flat pattern instead of the 3D folded shape:
- Open the part with the sheet metal feature.
- Go to the Sheet Metal tab.
- Click Flatten to create the flat pattern view.
- Right-click the flat pattern in the feature tree and choose Export to DXF/DWG.
- Select the desired options in the export window (such as layers, entities).
- Save the DXF file.
This ensures CNC machines receive the unfolded part geometry, which is critical for accurate cutting or bending.
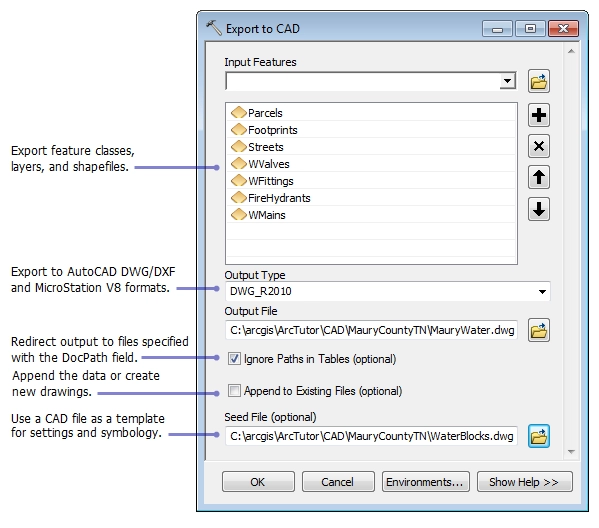
Exporting from a SolidWorks Drawing
For more complex projects or combined views, exporting a SolidWorks drawing to DXF is useful:
- Open or create a 2D drawing of your part or assembly.
- Go to File > Save As and select *DXF (.dxf)**.
- Choose which views or sheets you want to export.
- Check export settings like layer mapping, line types, and scale.
- Save the file.
Drawings allow you to prepare layered DXF files with annotations, making them easier to manage for CNC operators.
Key Export Settings to Choose
- Units: Match the DXF units (inches or millimeters) to your CNC machine’s requirements.
- Layers: Use layers to separate different cuts or engravings, if supported.
- Line Types: Ensure lines are continuous and closed for proper toolpaths.
- Scaling: Double-check scaling to avoid parts being too large or small.
- Spline Conversion: Convert splines to polylines if your CNC software doesn’t handle curves well.
By following these steps and settings, you create clean, CNC-ready DXF files from SolidWorks that minimize errors and setup time.
For a deeper dive into sheet metal specifics, check out the guide on designing sheet metal using SolidWorks.
Common Issues and Solutions
When exporting to DXF from SolidWorks, you might run into a few common headaches. Here’s how to handle them:
Fixing missing lines or geometry
Sometimes parts of your sketch don’t show up in the DXF. Use SolidWorks’ Repair Sketch tool to find and fix gaps or overlaps. Ensuring all lines connect properly is key for a clean CNC path.
Resolving scale problems
If your DXF file comes in too big or too small, double-check your units and scale settings both in SolidWorks and your CNC software. Mismatched units (inches vs millimeters) are often the culprit.
Converting splines to polylines
CNC machines usually don’t handle splines well. Convert splines into polylines or line segments before exporting. This keeps your toolpaths smooth and predictable.
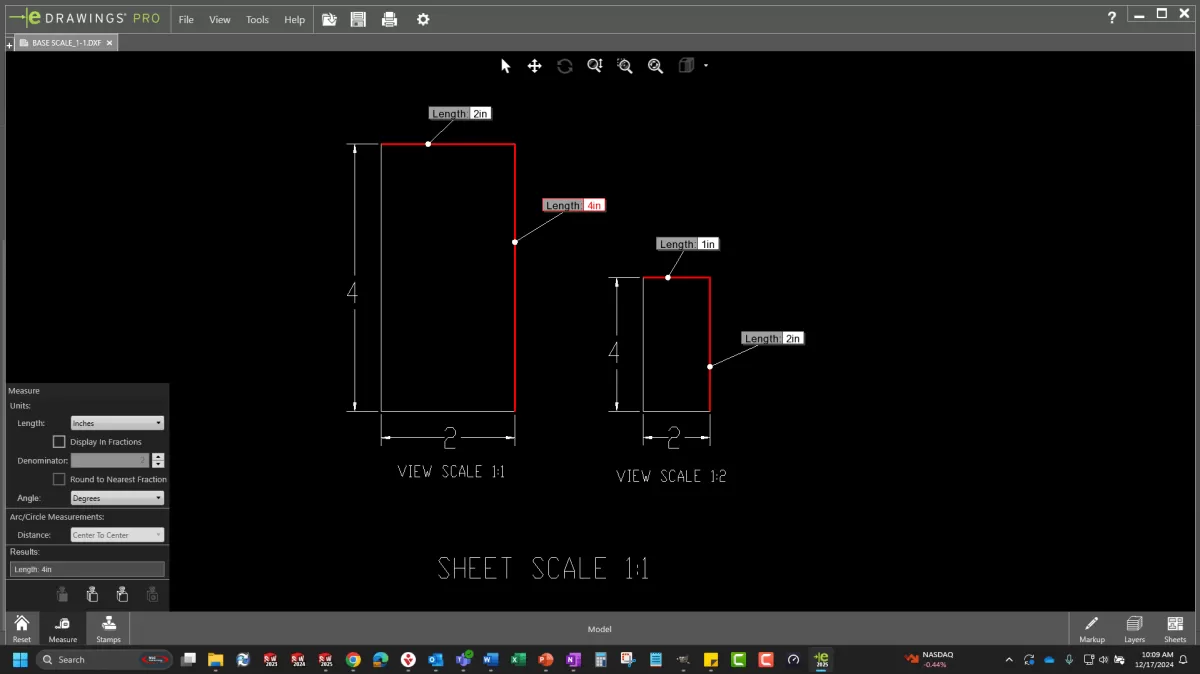
Testing your DXF uploads
Before sending a file off to production, upload your DXF into a viewer or your CNC software to verify everything looks right. Check for missing elements, scale accuracy, and layer organization to avoid surprises.
Addressing these issues early makes your SolidWorks to CNC workflow much smoother and helps ensure your parts come out exactly as designed.
Best Practices for CNC-Ready DXF Files
When you’re preparing DXF files for CNC machining, keeping things simple and organized saves time and avoids errors. Here are some key best practices to follow:
-
Simplify Geometry and Ensure Closed Contours
Make sure your design uses simple, clean lines without unnecessary details. Closed contours are a must since CNC machines need clear, continuous paths for cutting. Open or overlapping lines can cause issues or incomplete cuts.
-
Manage Layers for Cutting and Engraving
Organize your drawing by separating different operations on layers. For example, put cutting lines on one layer and engraving details on another. This helps CNC programmers quickly assign tool paths and settings without confusion.
-
Validate DXF Files with Viewers
Before sending your DXF to CNC, open it in a reliable DXF viewer or CAD software to check for missing lines or scale problems. This quick step spots potential errors early and saves you from costly mistakes on the shop floor.
-
Follow HYCNC Pre-Flight Checklist
HYCNC provides a handy pre-flight checklist to make sure your DXF files meet their quality standards. This includes verifying units, confirming layer setups, and ensuring all sketches are repaired and closed. Using this checklist helps guarantee your parts come out precise and ready to go.
By sticking to these best practices, your SolidWorks DXF export will be CNC-ready and compatible with services like HYCNC, speeding up production and boosting accuracy.
Why Choose HYCNC for Your CNC Needs
When it comes to CNC machining, trusting your DXF files with the right partner makes all the difference. HYCNC stands out because of their deep expertise in DXF file processing. They know exactly how to handle SolidWorks exports and other CAD formats to make sure your designs translate perfectly to the machine.
HYCNC supports multiple file formats beyond just DXF, giving you flexibility no matter how you design. Plus, their instant quoting system speeds up the ordering process, so you get quick estimates without the wait.
Most importantly, HYCNC prioritizes quality assurance. They double-check your files and machine setup to deliver precision parts that meet your specs every time. If you want smooth, reliable CNC service with expert help on your DXF files, HYCNC is a smart choice to get the job done right.